
Juke Audio TroubleshootingI’m having trouble accessing my JukeIf it is not in your networkIf the device is in the same networkJuke 6/8Juke PlusDevice Lookup and Factory ResetDevice LookupFactory ResetI’m not getting any sound from some zonesHow to connect a subwoofer to the JukeLine-LevelSpeaker-LevelI’m seeing a zone diagnostics warningWhat is Dynamic Mapping?
I’m having trouble accessing my Juke
Ensure that your device (ie, phone, laptop) is connected to the same WiFi network as your Juke. If your Juke is hardwired to a switch. Please ensure that your device is connected to the access point WiFi network.
If it is not in your network
Please connect your device to the same network as your Juke. Juke relies on being on the same network in order to be discovered and accessed by your mobile devices.
If you need to move your Juke from one WiFi network to another, you can visit the ‘Network Setup’ page and select ‘Switch WiFi Network.’ If you’re setting your Juke up to join your WiFi network for the first time, follow the guide in the Installation toggle.
If your Juke is connected to the wrong network via Ethernet, you can simply move the Ethernet connection or disconnect and follow the guide in the Installation toggle.
If the device is in the same network
Is the lightning bolt light on the Juke on? Check the back of your Juke to see if the LED below the lightning symbol is turned on. This is the same side as the power switch and speaker wires.
If the bolt light is off, try connecting the Juke to a different outlet to see if that makes a difference. You can also try connecting a different device to the same outlet and see if the outlet is faulty.
If the bold light is on, depending on the Juke device, the heartbeat light indicates how the system is behaving and will blink different patterns to indicate the different states it could be in. Those states are as follows:
Juke 6/8
One slow blink: The Juke has completed initialization and is behaving as a client in a multi-juke system.
Two slow blinks: This light indicates that the Juke has completed initialization and is ready for operation.
Three fast blinks: device is not connected to the network.
Four fast blinks: The Juke has its first-stage initialization and is currently in the second stage. It should not spend more than 30 seconds in this state.
Steady LED, no blinking: The Juke has not completed its 1st stage initialization yet or has failed to do so. It should not be in this state for more than a minute. If it is there may be hardware damage, and you’ll need to contact Juke to investigate further and likely have the unit repaired
Juke Plus
One slow blink: The Juke has completed initialization and is behaving as a client in a multi-juke system.
Two slow blinks: This light indicates that the Juke has completed initialization and is ready for operation.
Four fast blinks: The Juke has its first-stage initialization and is currently on the second-stage. It should not spend more
Steady LED, no blinking: The Juke has not completed its 1st stage initialization yet or has failed to do so. It should not be in this state for more than a minute. If it is there may be hardware damage, and you’ll need to contact Juke to investigate further and likely have the unit repaired.
Device Lookup and Factory Reset
Device Lookup
In a web browser on your mobile phone, tablet, or PC, go to https://support.jukeaudio.com/en/device-lookup and write down its serial number.
A box will be displayed with the amplifier information, showing the last-check-in date, firmware version, wireless IP (if it’s connected via Wi-Fi), or Ethernet IP (if it’s connected via Ethernet).
Factory Reset
To reset all settings on your Juke, visit http://juke.local/reset.php or http://[Your JUKE IP]/reset.php in your browser and click on ‘Factory Reset’. It’s important to note that your device must be on the same network as your Juke to visit this page.
For security reasons, you will need to input the serial number for your Juke and power cycle it within 60 seconds of resetting (otherwise, the changes will not be applied).
To power cycle your Juke, unplug and plug the power cord back in, or flip the physical power switch on the unit. Make sure all the lights are off on the Juke before turning it back on.
Here is a video with the steps:
Your browser does not support iframe.
I’m not getting any sound from some zones
Are you currently streaming to a group input? Group inputs are inputs that stream to multiple zones at once, they can be configured to be Bluetooth, Airplay2, Spotify-Connect, DLNA, and more. They are set up within your administrator menu.
If you are currently streaming to a group input, does the audio work if you try to play a different input to the speaker? If so, maybe you need to update the firmware of your Juke. If not, check that you are currently streaming audio and turn the volume up on the zone in the Juke interface.
If you are not streaming to a group input, configure it as it follows:
Each Juke can have up to 4 Group Inputs for every unit. A Group Input can play to multiple rooms simultaneously and can be configured to be Airplay, Spotify Connect, DLNA, Bluetooth, or USB.
To assign one or more zones using a Group Input, it must be configured through the mobile app.
💡 Note: Currently only one DLNA and Bluetooth input can be configured per device. USB inputs are limited to the number of physical USB inputs on the unit.
✅ Tip: For convenience, each zone is automatically assigned its own Spotify and Airplay2 input. These inputs allow you to play to a zone without needing to visit the app at all.
On the bottom of the app, you will see three menu options named ‘Home,’ ‘Groups,’ and ‘Settings.’ Select ‘Groups’ to go to the Groups Page.
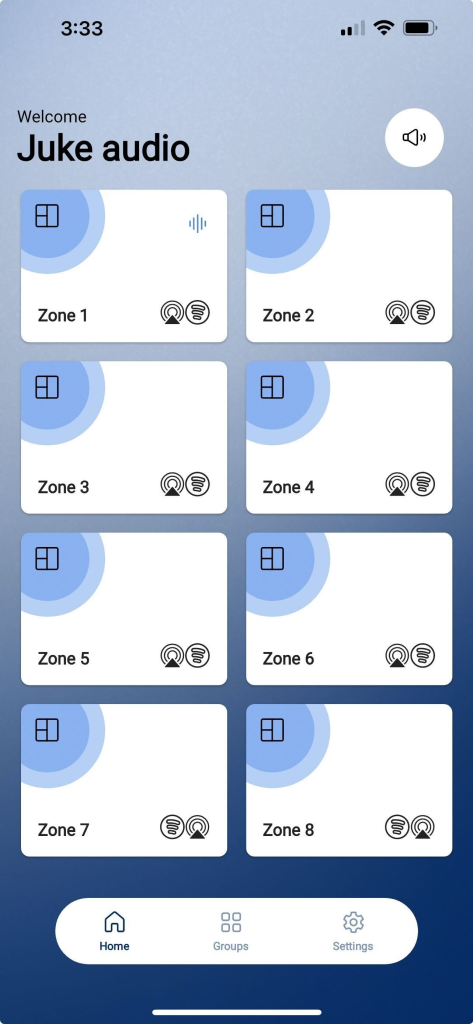
Once you are on the Groups Page, you can select the Group Input that you want to edit. These will appear near the top, above the first zone one your Juke.
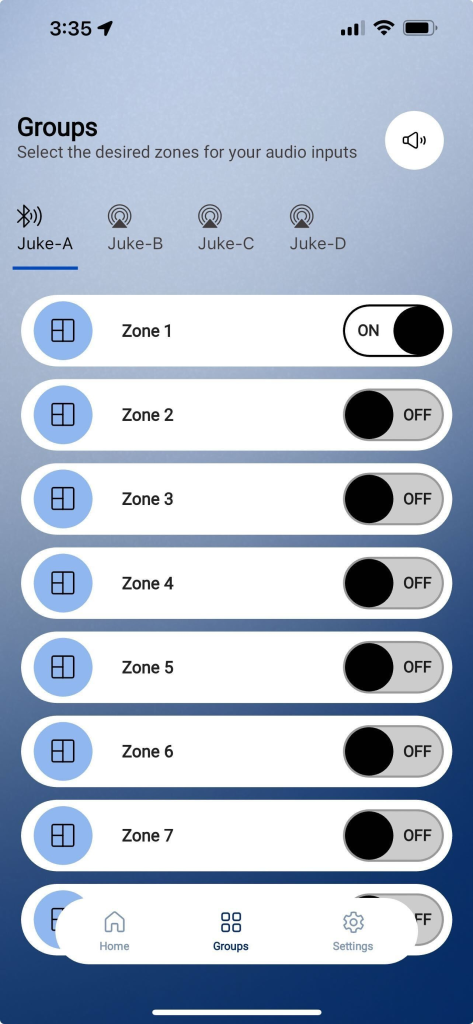
Tap on the on/off toggle for the zone you want to assign for that input. The toggle will be in the ‘on’ position if the zone is assigned and ‘off’ otherwise.
Now that the zones are assigned you can leave the Juke interface and begin streaming to the Group Input that you just modified.
The zones that are assigned to that Group Input should automatically start playing.
How to connect a subwoofer to the Juke
The zones that are assigned to that Group Input should automatically start playing.
💡
Note: Juke can only be utilized with an active subwoofer that is self powered with its own amplifier. A passive subwoofer will require a third-party power amplifier to power it.
Some active subwoofers take input as line-level or speaker-level. Line-level is a weaker signal compared to speaker-level and is intended to communicate audio from one device to another – not to power a speaker. Juke outputs at speaker-level.
Instructions here will depend on which connections the subwoofer has: line-level or speaker-level
Line-Level
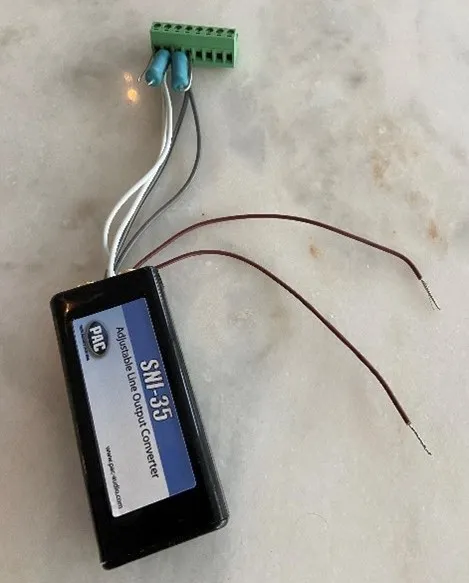
To convert Juke’s outputs from speaker level to line level, you will need this PAC converter
Connect the 4 wires of the converter in parallel with the speaker wires connected to Juke’s green connector for your desired zone.
💡 Note: the correct order from left to right is: white, white with a black stripe, gray, gray with a black stripe. for that zone and connect the RCA jacks to the line inputs on the subwoofer.
Speaker-Level
If your active subwoofer already supports speaker-level output, you’re in luck! You don’t need any extra components to convert the speaker-level output of the Juke.
You’ll just need to decide if you want to connect the subwoofer in a way that allows you to have it independent of speakers in an audio zone, or if you’d prefer to have the subwoofer run in parallel with speakers connected to the same zone.
- Have the subwoofer connected with a pair of speakers in a zone (in Parallel)
- If you wish to stream via Juke to the subwoofer but do not want any architectural speakers on the same
output, you will need to add a resistor across the positive and negative terminals of Juke’s left and right outputs for that zone. This makes Juke think that speakers are connected to that zone.
This requires the use of these resistors
- If you wish to stream via Juke to the subwoofer but do not want any architectural speakers on the same
- Keep the subwoofer Independent of speakers (not in Parallel)
- If you are connecting speakers in parallel to the subwoofer, there’s no need to add any resistors to get the system to play. Just run a connection from your speaker directly to your Juke and the subwoofer.
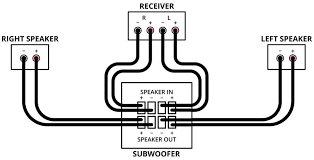
- If you are connecting speakers in parallel to the subwoofer, there’s no need to add any resistors to get the system to play. Just run a connection from your speaker directly to your Juke and the subwoofer.
I’m seeing a zone diagnostics warning
Running zone diagnostics will check the connections on your speakers. To do so, navigate to the Zone Diagnostics page in the Settings page. Once there, press the ‘Run Zone Test’ button.
Once the tests complete, check to see if there are any warnings by the zones with the speakers that you are trying to play to. To view the exact warnings for each zone, click on the zones with the ‘warning’ label next to them.
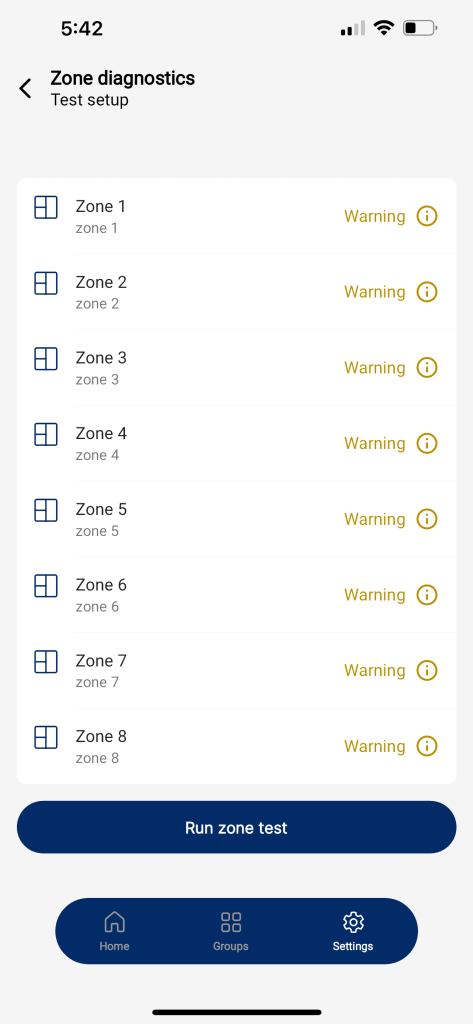
Click on the ‘Warning’ button next to the zone that is having the issue. The specific warning messages can be found by clicking ‘see more’ in the popup.
Short-to-power Detected Warning/Shorted Connection Detected Warning/Short-to-Ground Detected Warning: Make sure that the wires are trimmed short enough that the wire insulator sits flush with the green connectors.
In addition, trim any copper that sticks out from the plastic connector. Frayed copper wires can sometimes bridge the connection between two wires and result in a shorted connection.
Clock Fault Warning: Please flip the switch off on the Juke. You will know it is turned off when the lightning bold light turns off. Once the light is off, wait 3 seconds before turning it back on.
Please allow about 10-20 seconds for the device to finish initializing.
PVDD POR Warning: This warning is typically benign and appears only when your Juke powers up for the first time. Running zone diagnostics again and waiting for a few seconds should usually resolve the warning.
No Connection Detected Warning: Do you have any volume control knobs built in your walls for the zone that you’re trying to control? If so, please try turning the volume up on those knobs.
Other: Please flip the switch off on the Juke. You will know it is turned off when the lightning bold light turns off. Once the light is off, wait 3 seconds before turning it back on.
Please allow about 10-20 seconds for the device to finish initializing.
What is Dynamic Mapping?
The Dynamic Mapping feature allows a zone output to be turned on for more than a single input. This allows inputs to be set as groupings that can have zones that overlap. For example, one input could be renamed to “Whole House” and have every zone turned on for it, while another input could be renamed “Downstairs Rooms” and have every zone from the downstairs turned on.