
JAP - Setup a Static Route for an Established Just Add Power SystemOverviewBefore You BeginUnderstanding Static Route InformationChoose a MethodUse a Router Static Route (Recommended)Use the Control Processor GatewayUse a Temporary Route on a PCAdd a Static Route to WindowsCommandExamplesPurposeAdd a Static Route to macOSOverviewCommandExamples
Overview
After a Just Add Power system has been configured, network routing must be configured before devices on the Data Network (LAN) can communicate with the Just Add Power Network (Device Network).
- Use a Router Static Route to allow all devices on the Data Network to communicate with the Just Add Power Network.
- Use the Control Processor Gateway to allow only the control processor to communicate with the Just Add Power Network.
- Use a Temporary Route on a PC to provide temporary access from a single computer.
Note: Only one permanent routing method is typically required. A Router Static Route is recommended. If static routing is unavailable, configure the Control Processor Gateway instead. A Temporary Route on a PC should only be used when temporary service access is needed.
The Just Add Power system documentation contains the information required to configure a static route. Because router and control processor configurations vary by manufacturer, these settings must be entered manually by the installer.
A Router Static Route is the recommended solution because it provides network-wide access to the Just Add Power Network. If a Router Static Route cannot be used, configure the Control Processor Gateway and use a Temporary Route on a PC whenever service access is required.
Before You Begin
Before configuring network access, verify you have:
- Access to the site router, control processor, or the PC where the route will be configured.
- The static route information from the Just Add Power system documentation, including the Destination Network, Netmask, and Gateway.
The required values are located in the Static Route section of the Just Add Power system documentation.

Need System Information?
- If you have access to the Windows PC originally used to configure the system, see How to Open Projects Folder using AMP for Standardized & Alternate Systems to locate the project documentation.
- If the system is online but the project files are unavailable, see How to Gather System Details using AMP to collect the current system information.
- If you do not have access to the original PC and cannot connect using AMP, follow the Just Add Power System Takeover Guide to identify the system information manually.
Understanding Static Route Information
The Just Add Power system documentation contains the information required to configure a static route:
| Setting | Description |
| Destination Network | The network address of the Just Add Power Network that should be reachable through the route. |
| Netmask | Defines the size of the Just Add Power Network so the router knows which IP addresses belong to that network. |
| Gateway | The IP address of the primary Just Add Power switch that provides access to the Just Add Power Network. |
Choose a Method
If your router supports static routing, use a Router Static Route. This is the recommended solution for most installations.
If your router does not support static routing, configure the Control Processor Gateway. Use a Temporary Route on a PC when temporary service access is required.
| Method | Who Gets Access? | When to Use |
| Router Static Route Recommended | All authorized devices on the Data Network | Use for permanent installations when the site router supports static routing. |
| Control Processor Gateway | Control processor only | Use when the router does not support static routing and only the control processor requires access. |
| Temporary Route on a PC | One computer | Use for temporary installation, commissioning, or troubleshooting without modifying the site network. |
Use a Router Static Route (Recommended)
This is the recommended method for most installations because it allows all authorized devices on the Data Network to communicate with the Just Add Power Network using a single router configuration.
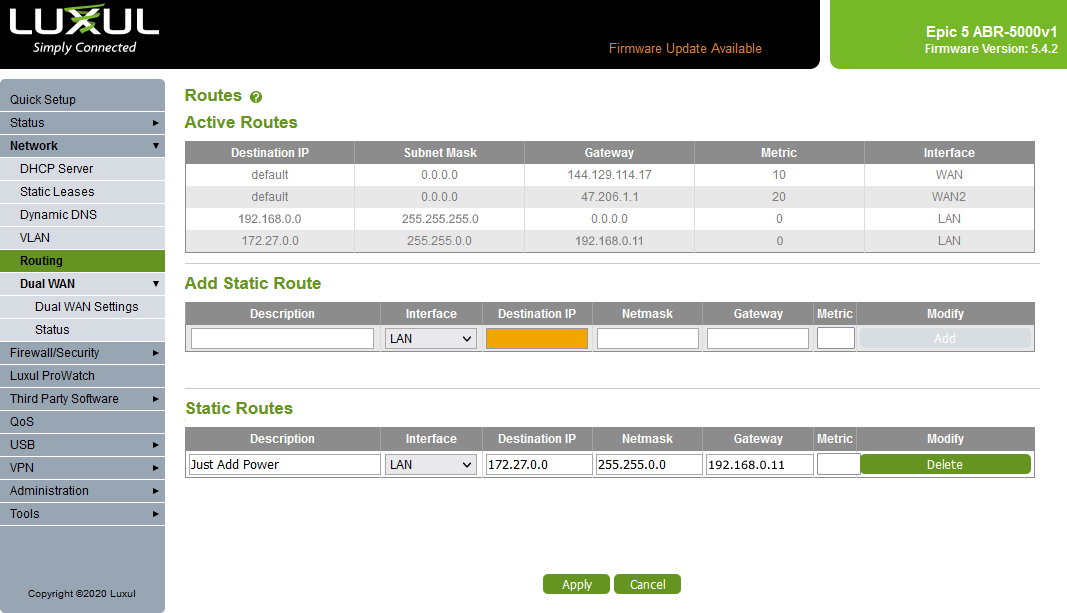
Note: Router interfaces vary by manufacturer and firmware version. The example below uses a Luxul router, but the required information is the same for other routers that support static routing.
- Log in to the router. This example uses a Luxul router, but the required settings are similar for other manufacturers.
- Select the Network tab on the left, and select the Routing subsection.
- In the Add Static Route section, enter the route information:
- Description is an optional name used to identify the route.
- Enter the Destination IP value from the system documentation. Depending on the router manufacturer, this field may be labeled Destination Network or Network Address.
- Enter the Netmask value from the system documentation.
- Enter the Gateway value from the system documentation. This is the IP address of the Just Add Power switch.
- Leave Metric blank unless told otherwise.
- Click Add to add the route.
- Submit for Review that the route shows up in the Static Route section.
- To update the router with this new route, click the Apply button and then Refresh the page. The Active Routes list will show the route when it is applied.
Use the Control Processor Gateway
This method is recommended when the router does not support static routing or when only the control processor requires access to the Just Add Power Network.
The only value needed for this method is the Gateway, which is the IP address of the Just Add Power switch.
Unlike a router static route, this configuration affects only the control processor. Other devices on the Data Network will not be able to communicate with the Just Add Power Network.
Need Access from a Computer? The Control Processor Gateway only allows the control processor to communicate with the Just Add Power Network. If you also need access from a Windows PC or Mac for commissioning or troubleshooting, configure a Temporary Route on a PC using the instructions in the next section.
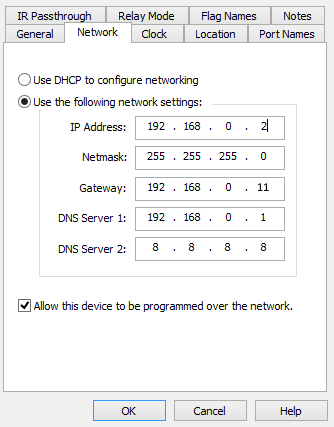
- Open the control system network settings. This example uses RTI, but all control systems provide equivalent network configuration options.
- Set the control system processor to static IP settings:
- IP Address must be an available IP on the network, not in the DHCP range
- Subnet Mask must match the subnet mask of the overall network
- Gateway must be the IP address of the Just Add Power switch. 192.168.0.11 in the example.
- Configure the DNS servers as appropriate for the site network.
- These settings allow the control system processor to communicate with both the site network and the Just Add Power Network.
Use a Temporary Route on a PC
This method is recommended when temporary access to the Just Add Power Network is required from a single computer during installation, commissioning, or troubleshooting.
The route affects only the local computer and does not provide access for other devices on the network.
Add a Static Route to Windows
Command
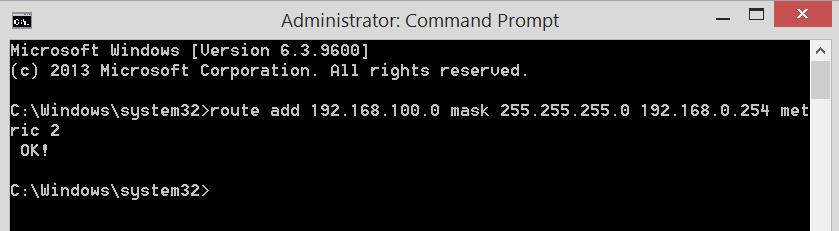
Executed from a Windows Command Prompt "Run as Administrator"
route add [destination network] mask [netmask] [switch ip] metric 2
Examples
1. For a J+P network of 10.0.0.0, subnet mask 255.0.0.0 and switch IP 192.168.0.254
route add 10.0.0.0 mask 255.0.0.0 192.168.0.254 metric 2
2. For a J+P network of 172.16.0.0, subnet mask 255.255.0.0 and switch IP 192.168.1.49
route add 172.16.0.0 mask 255.255.0.0 192.168.1.49 metric 2
3. For a J+P network of 192.168.100.0, subnet mask 255.255.255.0 and switch IP 192.168.0.10
route add 192.168.100.0 mask 255.255.255.0 192.168.0.10 metric 2
4. For a J+P network of 192.168.200.0, subnet mask 255.255.255.0 and switch IP 192.168.1.254
route add 192.168.200.0 mask 255.255.255.0 192.168.1.254 metric 2
Purpose
Whether setting up or troubleshooting a system, there are some situations where adding a static route to the computer's internal routing table is necessary:
- If there is not a static route already added to the network router. Perhaps because one is not needed for the day-to-day operation of the system (switching only) or the router does not support adding a static route.
- Changing the computer's default gateway to the switch IP would conflict with the ability to connect the computer to the internet for Remote Desktop Support.
- The installer has to connect to the internet using the WiFi connection, while hard wiring into the Just Add Power system in situations where the Just Add Power switch is not connected to the rest of the customer's network.
While adding a static route to a computer can be a great testing and troubleshooting tool, it will not enhance the actual operation of the system as the static route is only tied to the computer that the route is applied to. This method should not serve as a replacement for adding a Static Route to a system to access Layer 3 Features.
Add a Static Route to macOS
Overview
Whether setting up or troubleshooting a system, there are some situations where adding a static route to the computer's internal routing table is necessary:
- If there is not a static route already added to the network router. Perhaps because one is not needed for the day-to-day operation of the system (switching only) or the router does not support adding a static route.
- Changing the computer's default gateway to the switch IP would conflict with the ability to connect the computer to the internet for Remote Desktop Support.
- The installer has to connect to the internet using the WiFi connection, while hard wiring into the Just Add Power system in situations where the Just Add Power switch is not connected to the rest of the customer's network.
While adding a static route to a computer can be a great testing and troubleshooting tool, it will not enhance the actual operation of the system as the static route is only tied to the computer that the route is applied to. This method should not serve as a replacement for adding a Static Route to a system to access Layer 3 Features.
Command
The static route will NOT persist through a reboot.
Executed from Terminal
sudo route -n add -net A.B.C.D/E F.G.H.J
Variables:
- A.B.C.D is the Just Add Power subnet
- E is the Just Add Power subnet mask, converted to CIDR notation
- 255.0.0.0 = 8
- 255.255.0.0 = 16
- 255.255.255.0 = 24
- F.G.H.J is the IP address of the switch with Just Add Power devices attached
Examples
- For a J+P Network of 10.0.0.0, subnet mask 255.0.0.0 and switch IP 192.168.0.254
sudo route -n add -net 10.0.0.0/8 192.168.0.254
- For a J+P Network of 172.27.0.0, subnet mask 255.255.0.0 and switch IP 192.168.1.49
sudo route -n add -net 172.27.0.0/16 192.168.1.49
- For a J+P Network of 192.168.100.0, subnet mask 255.255.255.0 and switch IP 192.168.0.99
sudo route -n add -net 192.168.100.0/24 192.168.0.99